Recently, We have posted few posts about WordPress and why it is the number one blog publishing application, which includes easy installation. There are a couple of ways to install WordPress i.e. manually and via 1-click installers.
Today, I would like to discuss on how to install WordPress the simple and quick way… via 1-click installers. Yes, with no advanced knowledge in programming required!
Install WordPress using 1-click installers
What is an 1-click installer? It is an application that allows you to easily install a variety of software, regardless of where you source the software from. It is similar to a library of software and scripts neatly categorized into categories.
Such as content management systems (CMS), e-commerce, photo galleries, forums and of course blogging software (that includes WordPress).
Most applications found here are open source and thus, free but there are also a few premium ones too for those who requires advance features. Not only will auto installer help you create an impressive website. But it will also ensure that you can update and easily upgrade your applications in the future.
Most web hosting providers offer 1-click installers for their customers. This enables the customers to easily install a good variety of popular applications and scripts.
Why do experts recommend 1-click installers?
- Easy to install popular scripts
- Spare you the need to learn up the technical part of software installation
- Included free in many web hosting plans
- Because web hosting providers offer the installers, the installers are configured to work seamlessly with your server
- You will be able to easily upgrade your software in the future
There aren’t many disadvantages of 1-click installers but I think this may be one:
Depending on which web host you subscribe to, you may need to wait for the update patches since it depends on when the 1-click installer updates the tool.
Having said that, not all installers have this delayed updates problem. Thus, it is important to ensure that the auto scripts installer you use is reliable and frequently updated.
Softaculous Auto Installer
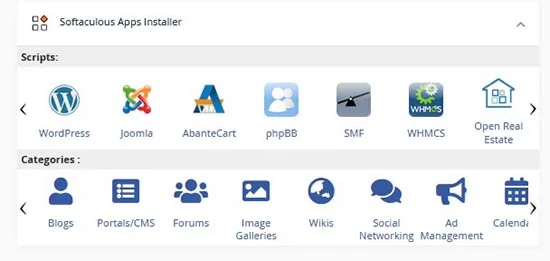
Softaculous is one of the most popular 1-click installers now. It provides management of over 380 top applications, including WordPress. It allows you to instantly install an application with just a click of a button.
And not only that but it also will create a database and copy the files as well as make changes to file and folder permissions automatically to complete the installation.
New versions of the software they support are updated minutes after it is released to ensure bugs and security patches are available for their users. Users will then be notified of these updates via emails and / or control panel notifications.
Did you know Softaculous also offer remote installation ? This means that you can use this software to install applications on your website regardless of whether your web host supports it or not. So, if your web hosting provider does not provide Softaculous, it doesn’t really matter as you can install the application yourself with remote installation service by using FTP.
How to install WordPress using Softaculous?
Very easy and can be completed within a few minutes. Below is our beginners’ guide to installing WordPress using Softaculous. Do note that this tutorial is based on the assumption that you are hosting with a web host that offers cPanel and Softaculous, like ServerLanka.
1 . Login to cPanel
Your Auto installer software is located in your hosting account control panel, in this case, your cPanel. Scroll down to “Software” and you will find the Softaculous icon. Click on it and you will see a long list of applications and scripts available for installation.
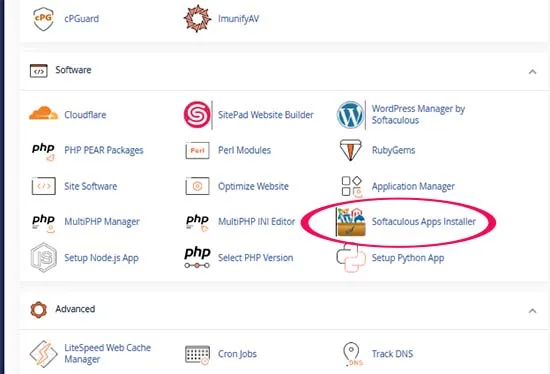
As mentioned above, there are free and premium scripts. Premium scripts provide more features, functionality and support. WordPress is free.
2 . Click on WordPress
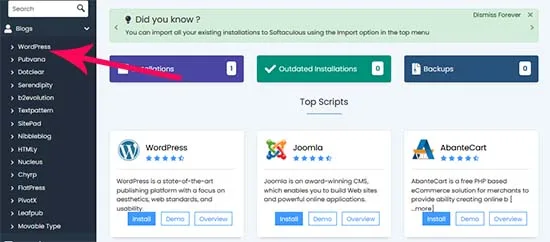
Under “Blogs”, look for “WordPress” and click the icon (also you can find wordpress in Top Scripts list). You will come to the “Install WordPress” page. There is a brief description of what WordPress is.
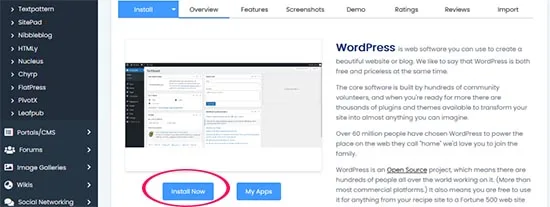
At this page, you will be able to see Install Now button. Click on “Install Now” to continue with a new installation. There are also 2 options available , quick install and custom install . Select custom install option .
3 . Installation Settings
You will then come to the settings page. There are 3 steps here.
Step 1 – Installation Preferences
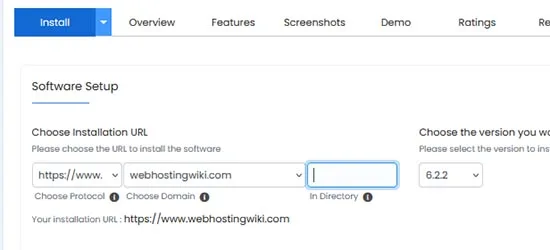
Which WordPress version
Here, you are asked to select the WordPress version you want to install on your website. In the drop down menu, there is a list of all available versions. Unless you have a good reason to do otherwise, always choose the latest version. This is to ensure your website has the most latest security and features. You can double check the latest version on WordPress website.
WordPress installation directory
Next, you will be asked the location you wish WordPress to be installed. When enter in your domain, you have the option to key in with “www” or without “www”. It doesn’t really matter which you choose. It’s usually a personal preference. Your SEO is not affected by this. Don’t forget to select https (you can use free ssl certificate provide by cpanel ,lets encrypt or cloudflare) .
You also have the option to install WordPress in any other folder on your website. Perhaps you may wish to create a separate blog page using WordPress on your website (in a sub-folder), for example mydomain.com/blog. In this case, type “blog” in the “In Directory” text box.
However, my advice to beginners is to leave this sub directory blank and install WordPress on your root.
Step 2 – Advanced Option
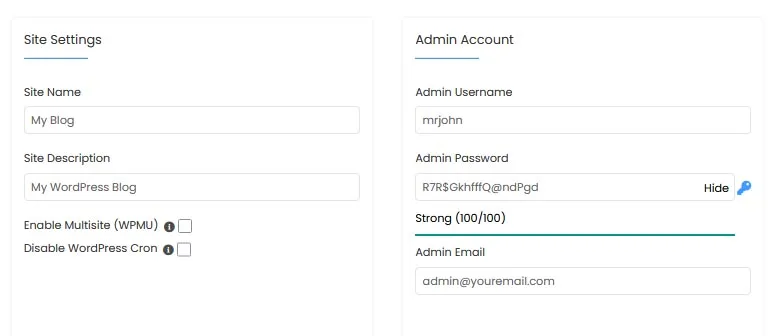
Step 2 is where you can set some advanced options.
Username and password
Create your own strong password without generating a random password. For security purposes, it is advised that you key in a different username and password from your cPanel login and not use the default “admin” as your username.
Admin Email
Add a email for admin account . use a active email address for this .
Create new database
Here you can set database name and table prefix , or keep default settings .
Step 3 – Plugins and Themes
Step 3 offers you the option to install some plugins and themes. You can opt to install them.
Personally, I prefer to start on a clean page without pre-configured plugins and themes. It’s easier and less messy to install these software once WordPress is ready. We will discuss these on as separate post later. For this time, uncheck all the checkboxes.
4 . Completing the installation
Click on “Install” and you are done. Simple wasn’t it? Once you have successfully installed WordPress, you will receive an email with the login details (if you add a email for “Email installation details to” text box).
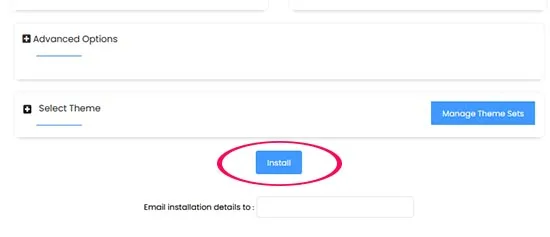
Alternatively, you can stay on the same page and wait for the installation to be completed, which takes 1-2 minutes, depending on your server speed and Internet connection. Go ahead and login and proceed to start setting up your WordPress website.
Your newly installed WordPress comes with sample posts, comments etc. There are quite a few housekeeping and configuration that need to be taken care of but no worries, we will look into these in more tutorials to come.
Editor’s Notes
Congratulations on your first step to creating a WordPress website.
WordPress is no doubt one of the easiest and most friendly blog publishing software there is. And web hosts like ServerLanka makes it simple for non-geeks to create a WordPress website painlessly. There will be more tips and guides coming up so stay tuned.

