How to move WordPress website to a new web hosting company
What if I tell you that move WordPress website from one web host to another is a walk in the park even for a first-timer? You probably think that either I am trying to pull your leg or I am exaggerating.
Well, I’m not. However, I do not deny the fact that many people are fearful of the idea of manually moving their websites. I am not even talking about the actual physical move yet, which probably will cause some people to hyperventilate!
But like what the psychologists said, humans have a tendency to fear the unknown. Remove this uncertainty, find out what needs to done, and then, you’ll be fine.
OK, so may be move WordPress website is not as simple as 1-2-3. Especially, if you are not very well versed in IT and hosting. Yes, moving a website is somewhat technical and thus, a little tricky but it is definitely not a daunting task. WordPress has been developed in such a flexible way that it allows you to easily handle the move.
WordPress.org has a great and very detail write-up on how to go about moving your WordPress website. There are many scenarios and options given. However, the article can be overwhelming if you are new to this migrating business.
In this post, I will try to present the steps in a simple and easy to understand guide.
Before we start WordPress site migration

Finding a good web hosting provider is not an easy task. Furthermore, your priorities change as time goes by. For example, when you first started, you may subscribe to a web host who can offer you the cheapest rate. As your traffic grows and sales increases, other factors become essential too like speed and security.
You may now find your current web hosting company lacking in certain services and would like to change to a new hosting company, or upgrade to a VPS plan.
One of the most common problems faced when contemplating to change web hosts is the fear of making mistakes when moving. To solve this problem, you can hire professionals to help you move the website. Less stress for you but you should also prepare to fork out a tidy sum!
Alternatively, you can do it yourself and save the pricey fees these professionals charge. Check out the following steps and see if it can build your confidence to move WordPress website yourself.
There are a few common WordPress website migration scenarios i.e. from moving the website within the same server (as in moving from a sub-directory to root directory) and from one server to another (as in when you want to change web hosts). This post is about the latter i.e. moving from one web server or web host to another.
The other thing that you need to know is that a WordPress website consists of the following 2 main parts and your website won’t work properly without one or the other:
- The files : These are the WordPress application files, including any plugins which you have installed. Of course, don’t forget any images you have uploaded.
- The data : This is the database where your posts, settings, comments and so on are kept.
Move your WordPress website
I assume that you have already created your domain name and have found a reliable web hosting provider to move to.
Let’s get start, step by step.
1 . Back Up Your WordPress Files
I can’t stress enough how important this step is. You should always back up every part of your website before even attempting to move your website or for that matter, make any changes to it. It is common sense as well as good web hosting practice.
For the purpose of website migration, you will need to perform a manual back up rather than depend on a backup plugin, so that you have more control.
To do so, you will require an FTP client. A popular FTP client is FileZilla, which is available for free. FTP to your web server and download your website files into a folder on your local computer (to upload to your new web host later). You may want to rename this folder as “backup” or add “old” to distinguish it from the other folders.
How long the downloading will take depends on how many files (themes, plugins, and images etc) you have. So, be patient. Meanwhile, we can proceed with Step 2.
2 . Exporting WordPress Database
Now, let’s transfer your database. It’s pretty straight forward and can done via your current web host’s control panel.
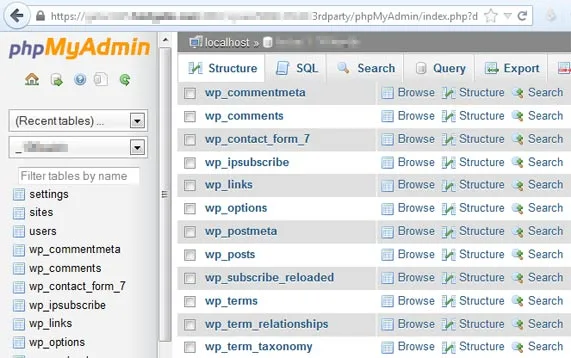
Once you log into your web hosting account, look for the phpMyAdmin application. For many web hosts, it is located in the “Database” section.
- Click on it and a pop-up will appear. If prompted, login using your phpMyAdmin username and password.
- You will notice a list on the left sidebar. Select the WordPress installation database.
- Click on the Export link.
- The default options are “Quick” and in “SQL” format. These options are adequate for our migration purpose.
- Save the database to your local computer. Again, you may want to add “old” or “backup” in this database folder.
3 . Create a WordPress Database on New Web Host’s Server
Before your database can transfer over, you will first need to prepare your new web host for the move. It’s just like how you would renovate your new house before moving in your furniture.
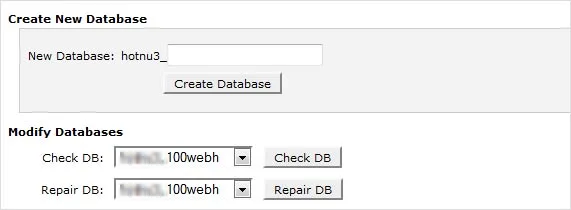
All you need to do is login to the new web host. From the control panel, go to the “Database” section and select “MySQL Databases”.
You will then directed to a database setup page. Here, choose to create a new database and give it a name that’s related to your website.
Then, create a MySQL user for yourself and enter a secure password. Remember these information as you will need them soon. Assign this user to the new database and grant it “all privileges”.
Should you not be able to locate the “MySQL Databases” icon, do contact your web host’s support team so that they can help you.
4 . Edit the wp-config.php File
Now that you have created the new database, it’s time to edit your WordPress configuration file.
Remember the WordPress files that you downloaded to your local computer in Step 1? Among those files is one called wp-config.php. This is the above mentioned WordPress configuration file and it controls the access between WordPress (which displays your website) and your database. Therefore, you will need to modify this file in order for it to recognize the new database in the new web host.
But before you start making any changes, make a copy of this wp-config.php file for backup. Save it in another folder in your local computer in case you make any mistakes in the modification later. Leave the original as working copy.
Now open up the working copy in Notepad or another text editor. Locate the following lines and make these changes:
- Database Name Locate define(‘DB_NAME’, ‘old_db_name’) where ‘old_db_name’ refers to your old web host’s MySQL database name.
Change this to the name of your new database i.e. the one that you created in step 3 above. - Database Username Locate define(‘DB_USER’, ‘old_db_user’) where ‘old_db_user’ refers to your username with the old host.
Change this to the name of the new username that you created in step 3 above. - Database User Password Locate define(‘DB_PASSWORD’, ‘old_db_password’) where ‘old_db_password’ refers to your password with the old host.
Change this to the new password that you created in step 3 above.
Now, save the wp-config.php file and close your text editor.
5 . Importing Your Database
What you did in Step 4 is to prepare your new web host to receive your database. We are now ready to import the database into the new web host. Below are roughly the steps you should do.
- Log into your new web host’s phpMyAdmin.
- Click on Database from the list on the left sidebar.
- Click on the Import tab.
- Click on Choose File
- Select the SQL file that you exported in step 2.
- Click Go.
Again, if you have a large database, it will take a longer time to import. Once completed, you will see a message confirming that the import is successfully done.
6 . Upload WordPress Files to New Web Host
Remember when we said earlier that your WordPress website consists of both WordPress files and your database? Well, now that you have imported your database into your new web host, it’s time to upload your WordPress files so that your website can work as before. Be sure that the amended version of wp-config.php is part of these files.
Once again, use your FTP client (FileZilla is good) to connect to your new web host’s server. Locate and select the folder where your website will be stored at. Proceed to upload your WordPress files. This upload may take a little long so go ahead and make yourself a cup of coffee.
Do note that you should not delete the files that were saved onto your local computer even after the upload is completed.
7 . Tying Up Loose Ends
You are almost done now. You just need to sort out a few matters here and there. However, because this part is rather subjective, I will not be able to touch on all of them.
One post migration work that you will need to look into is to reconfigure your domain’s DNS settings. Each web host has different name servers and unless you point your domain to the right directions (i.e. your new server’s IP address), your website won’t work.
I will not be including the steps to reconfiguring your DNS in this article as it can be pretty lengthy and involves lots of options. Should you have any problems, do leave a comment and perhaps I will write another article on this. You can also contact your web host’s support team to assist you.
Last but definitely not least is to test your new website to make sure all links and features are working fine.
Conclusion
Now, that wasn’t too difficult was it? Like many things in life, move WordPress website is not all that complicated once you have listed down all the steps. Sure, there may be some hiccups here and there. But if you have read and understand what is to be expected during the entire migration process, you will have fewer of such unwanted hiccups.
In other words, you need to be prepared for the migration in order to do it properly. If planned and executed correctly, your website can be moved to the new web host seamlessly.
What’s the worst thing that can happen? Well, you may make a wrong move wordpress website somewhere and the website doesn’t work. But you won’t have to worry because you have done Step 1. So, one very important thing to remember is to always back up your website before you start. This way, should you made any mistakes or need to undo your actions, you can always fall back onto your backup.